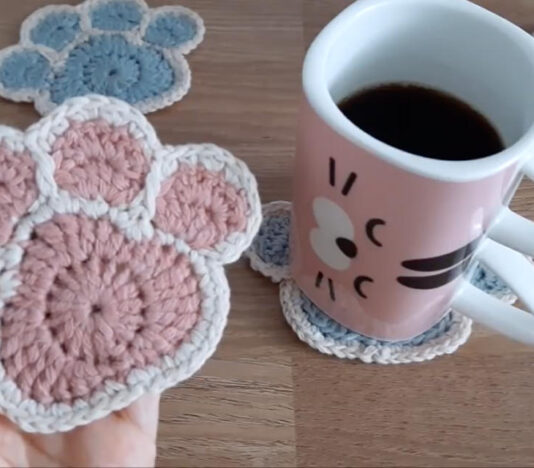
Creating your own crochet designs has never been easier. And if you need to add some pizzazz to your project, you might want to consider the Crochet Paw Print project. It’s not complicated as only a few basic tools are needed. It is possible to turn silly things into authentic works of art!
If you want to learn how to create beautiful crochet footprints, the first step is to know the basics. You must choose a type of crochet and understand the reasons that create your patterns. Making a chart is one of the most essential parts of any crochet project, and there are many types of charts, as well as many methods for following them.
Our crochet paw print tutorial will explain the basics of this wonderful art, as well as teach you how to create some adorable crochet paw prints. Once you’re familiar with crochet basics, you’ll be ready to try this fraternally cute version.
The crochet paw print project is a great way to discover new motifs. It’s also a great way to relax and enjoy the wonderful art of crochet. To have real crochet paw prints in your work, look up the instructions below and follow the crochet tips.
Paw print crochet tutorial easy to make | How to make? Step by step in detail
Step by step:
1. Start by casting off a magic ring with 6 stitches high, tightening the ring well.
2.3 Pd on the side – Make 3 double crochets on the side of the ring.
3. Double High Dot – Do 2 high dots in the same space.
4. High Dp – Do 1 double dot in the same space.
5. Jump – Jump one space
6. Repeat steps 2–5 two more times to make 7 fully.
7. Finish off – finish off with a single crochet in the first double crochet at the beginning of the round.
8. Close – Close the magic ring, tightening it well.
9. Repeat step 2–8 to complete 8 circles on the paw print lid.
10. Align the circles – align the circles so that they are very round.
11. Close the bottom of the paw print – Close the bottom of the paw print using single crochets, working as follows:
(Ds down, skip 3 baskets, 4 sd down, skip 2 rows, 5 sd down, skip 3 rows, 4 sd down).
12. Finish off – finish off with a single stitch on the initial row.
You just made the paw print! 🙂
Benefits and advantages of Paw print crochet tutorial easy to make
1. It’s a great project for beginners with crochet because of its simplicity.
2. The instructions are simple and easy to follow, so anyone can create a beautiful crochet Paw Print project.
3. It is ideal for developing skills and improving your crochet knowledge.
4. Step sizes are flexible, so everyone can adapt the project to their skill level.
5. It is easy to edit to create the final piece according to your preferences.
6. You can use different linetypes to change the appearance of the project.
7. It is ideal to please family and friends as it is simple and nice design.
8. It is possible to customize by varying the colors.
9. It is accessible to the general public, as it is not necessary to purchase special equipment.
Final considerations
The Paw Print Crochet tutorial is a complete and simple-to-follow guide that makes it possible for anyone to create their own project. It involves using basic crochet knowledge as well as explanations and tips on the fibers and tools used to make this design.
You can use different colors and sizes of yarn to create unique and even more diverse projects. In addition, there are different variations and modifications of this pattern, which creates even more possibilities for those who want to produce their own works of art.
We recommend that all those interested in learning to crochet and creating their own projects use this tutorial as a reference.
Deixe um comentário